How to Get the Best Out of Your Epoxy Timber Repair with Evermend
- sales77129
- Sep 23, 2025
- 7 min read
Updated: 15 hours ago
Epoxy timber repair done well is virtually invisible. Done badly it fails within a season, cracking, debonding, or producing a finish that looks worse than the original damage. The difference between the two outcomes is almost never the product. It is the technique.
At Evermend we have decades of hands on experience using epoxy timber repair systems in the field in sash window restoration. This guide covers the techniques, tips and common mistakes that separate a repair that lasts twenty years from one that fails in twelve months.
Start With a Proper Assessment
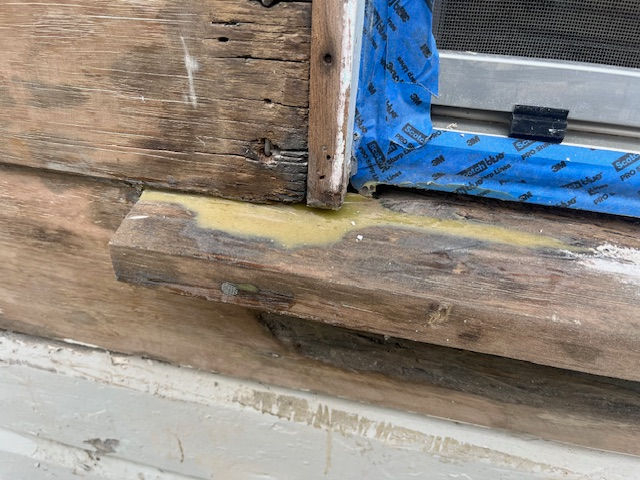
The single most important thing you can do before picking up any product is to properly understand the extent of the damage you are dealing with.
Press a sharp tool firmly into the timber around and well beyond the visible damage. Sound timber resists. Decayed timber gives way. Map every area of soft timber carefully rot almost always extends further than it appears on the surface, and a repair that leaves decay behind will fail regardless of how well everything else is done.
Take your time with this step. A thorough assessment at the start saves significant rework later.
A Critical Note on Lead Paint
Before any physical work begins on a pre 1977 home, stop and consider lead paint.
There is a strong possibility that timber surfaces have been painted with lead based paint at some point in their history. Lead was commonly used in exterior paints in Australia until it was phased out in the late 1960s and early 1970s. In older homes multiple layers of lead paint are often present under subsequent coats.
Disturbing lead paint through chiselling, scraping or sanding creates fine dust and debris that is hazardous to health. Refer to NSW Health or SafeWork Australia websites for further instruction and advice or.
Moisture is Everything
If there is one technical factor that causes more epoxy repair failures than any other it is moisture. Epoxy bonds chemically to timber, but that chemical bond is severely compromised if the timber moisture content is too high.
Before applying any Evermend product, check the timber moisture content with a moisture meter. The target is below 18 percent. Above that level adhesion is unreliable and long term performance is compromised.
In practice this means planning your repairs around the weather. Do not repair timber that has been saturated by recent rain without allowing adequate drying time first. In persistently damp conditions a hot air blower can accelerate drying, but be careful not to apply excessive heat to old or fragile timber.
Also address the source of moisture before repairing. Epoxy will not solve a drainage problem, a failed paint film or a blocked gutter. Fix the cause first or the repair will simply fail again.
Remove All Decay — No Exceptions
The Evermend Timber Stabiliser is a remarkable product. It penetrates deep into deteriorated timber fibres and hardens them from the inside out, creating a sound substrate where previously there was soft crumbling wood.
What it cannot do is replace the removal of genuinely rotten material. Stabiliser consolidates compromised but still present fibres, it does not replace timber that has already deteriorated beyond recovery.
Cut back to sound timber on all sides using a chisel, router or sharp knife. The resulting void will often be larger than expected, that is fine. Epoxy fills voids without shrinking so the size of the repair area is not a problem. What is a problem is filler applied over decay that has not been fully removed.
Brush away all dust and loose debris before proceeding.
Never Skip the Stabiliser
Once the decay is removed and the timber is dry, apply Evermend Timber Stabiliser to all exposed surfaces of the repair area before touching the filler. This step is non negotiable.
The stabiliser does three things. It penetrates and hardens any remaining soft fibres at the edges of the repair area. It seals the timber surface against further moisture ingress during the repair process. And it creates an ideal bonding surface for the epoxy filler to adhere to chemically.
Apply generously with a brush. Watch how the timber absorbs it — soft or porous timber will drink it in quickly. Allow to cure before proceeding — typically 20 minutes.
The stabiliser is the foundation the entire repair sits on. A repair done without it is significantly less likely to last.
Choose the Right Cure Time for the Job
One of the most common causes of a poor finish is using the wrong cure time product for the repair at hand.
Evermend 1 Hour Cure is ideal for smaller repairs, surface work and situations where you need to get back to sanding and painting quickly. It gives you enough working time for straightforward repairs without the wait of a longer cure product.
Evermend 4 Hour Cure is the right choice for larger repairs, deeper voids, complex profiles and any situation where you need time to carefully build up and shape the epoxy. Its extended working time means you are not rushing the most critical part of the job.
The rule of thumb is simple, when in doubt choose the 4 Hour Cure. A rushed repair with inadequate working time produces a poor finish. The extra waiting time for cure is insignificant compared to the cost of redoing the work.
Mixing: Get It Right Every Time
Evermend products are available in two formats — cartridges and self mix pots.
Cartridges dispense the precise quantities of the activator and base. Always dispense a small amount of product onto a scrap surface first before applying to the repair — this ensures the two components are mixing evenly through the nozzle before you commit to the actual repair area.
Self mix pots require hand mixing of the two components. Follow the ratio instructions carefully and mix thoroughly until the colour is completely uniform with no streaks.
Incomplete mixing produces a repair that will not cure properly, it will remain soft or tacky in areas and will not achieve full strength. Take the time to mix properly.
In both cases work within the stated working time for the product. Do not try to extend working time by refrigerating the product or adding anything to it.
Application: Build Up in Layers
For deep voids or large repair areas, do not try to fill the entire depth in a single application. Apply the epoxy in layers, pressing each layer firmly into the repair area to avoid air pockets and ensuring good contact with the stabilised surfaces.
For very deep voids allow each layer to cure partially before applying the next. This prevents the heat generated by the curing reaction from building up excessively in a large mass of epoxy.
Always slightly overfill the repair area. Evermend does not shrink as it cures so a small amount proud of the surface can be sanded back to a flush finish. Underfilling leaves a depression that cannot be corrected without applying more product.
Shaping: The Skill That Makes the Difference
The quality of the finished repair is largely determined by how well it is shaped during the working time, before it cures.
Use a filling knife, profile gauge or gloved finger to shape the epoxy as closely as possible to the final desired profile while it is still workable. On heritage timber with complex moulded profiles, take particular care to replicate the original shape, the closer you can get during application, the less corrective sanding is needed and the better the final result.
Work deliberately and methodically. The extended working time of the 4 Hour Cure exists precisely to allow this level of care and attention during application.
Sanding, Priming and Painting
Once fully cured, Evermend sands cleanly and easily. Start with a medium grit to remove any excess material and refine the profile, then finish with a fine grit for a smooth surface ready for primer.
Do not skip the primer coat. A good quality exterior primer seals the repair, ensures the paint film bonds correctly, and significantly extends the life of the paint job over the repair area. Apply primer promptly after sanding, epoxy that is left exposed to UV for extended periods can yellow slightly before painting.
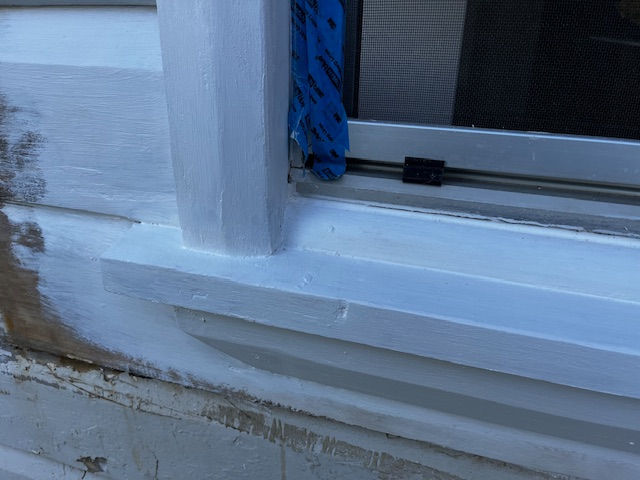
Finish with two coats of your chosen paint, feathering the edges slightly beyond the repair area to blend the finish seamlessly into the surrounding timber.
A properly prepared, primed and painted Evermend repair is completely invisible. It will not crack, shrink or telegraph through the paint film. Done correctly it will still be there in twenty years.
The Most Common Mistakes and How to Avoid Them
Skipping the stabiliser. The most common and most costly mistake. Always use it.
Applying to wet timber. Check moisture content before starting. Allow adequate drying time.
Not removing all decay. Probe thoroughly and cut back further than you think you need to.
Using the wrong cure time. Match the product to the job. When in doubt use the 4 Hour Cure.
Underfilling the void. Always slightly overfill and sand back.
Rushing the shaping stage. Take the time to get the profile right during application.
Skipping primer. Always prime before painting for a finish that lasts.
Safety
Evermend products are safe to use when handled correctly. Always wear protective gloves when handling resin and hardener components. If product comes into contact with skin wash thoroughly with soap and water immediately. Work in a well ventilated area. On any pre 1970 property always test for lead paint before any cutting, chiselling or sanding, see the lead paint section above for full details.
The Bottom Line
Getting the best out of Evermend epoxy timber repair comes down to preparation, moisture management, the right product choice and taking the time to shape and finish the repair properly. Follow these steps and you will achieve results that are strong, permanent and completely invisible once painted.
Comments